
Here’s a step-by-step guide on the painting of my Afrika Korps models. It’s pretty straightforward; this approach allows me to get gaming as soon as possible with some colours on my models – and then upgrade the models using a few phases.
I’ll kick off by showing a progress strip of photos, then go through these steps in order: basing, base colours, then finishing touches.


ONE: BASING
- Wood putty, slate
- Sand, PVA glue
- Agrellan Earth (Citadel Technical Paint)
Two steps in basing. The first being to use wood filler to blend the model’s base into the base you’re mounting it on. I add some slate at this point because I can blend it into better.
Wood putty was applied using a plastic DAS tool, which was picked up in an art store. After loading the wood filler onto the base I use a dab of water on the end of the DAS tool to help smooth it. Because the DAS tool is plastic it is flexible and so is perfect for the role.

The second step is to add some sand, through which I have added some larger bits for more variety. An area on most of my bases was left without sand, to which I then applied some Agrellan Earth (Citadel’s excellent texture paint).
Once this has dried overnight I seal it using a watered down PVA glue (add water until it’s a milky consistency) which basically bulletproofs the base and means the sand doesn’t come off.

TWO: BASE COLOURS
- Dunkelgelb (The Plastic Soldier Company’s Army Sprays: WWII Armour)
- 70.879 Green Brown, 70.887 Brown Violet, and 70.977 Desert Yellow (Vallejo’s Model Colour range)
- Rhinox Hide, Abaddon Black, Boltgun Metal, Tallarn Flesh (Citadel)
Again, two steps here. Firstly I applied an undercoat of dunkelgelb from The Plastic Soldier Company’s Army Sprays range. As you can see above I kept a brown theme while building so that I could kid myself that it was okay to play test games with unpainted models; with the addition of dunkelgelb I could see these guys tramping through the desert… even if my opponents couldn’t.
One nice even coat did it. Loved the spray and would certainly recommend it.

Second stage was to get the base colours onto the model. I chose Africa Korps over 8th Army because of the wider variety in uniform colours due to sun bleaching. That said, I kept a tight palette to retain some coherency across the force. My primary colours were taken from the Vallejo Model Colour range and were Green Brown, Brown Violet, and Desert Yellow. As the latter was used for my support weapons and armour this tied them to the infantry.
The only rules I used when applying these three colours were that (1) I would use less of the ‘new uniform’ Brown Violet through the force, and (2) All helmets and most of the caps would use Desert Yellow.
This go the force ready for the gaming table in short order and when applying the 3-foot rule gave satisfaction as a ‘fully painted’ force. I was happy enough with this start on the army.

THREE: FINISHING TOUCHES
- 70.879 Green Brown, 70.887 Brown Violet, and 70.977 Desert Yellow (Vallejo’s Model Colour range)
- Rhinox Hide, Abaddon Black, White Scar, Karak Stone, Boltgun Metal, Tallarn Flesh (Citadel)
- Agrax Earthshade, Nuln Oil, Ogryn Flesh, Gryphonne Sepia (Citadel)
- Bushes / Clump foliage (Woodland Scenics)
Getting a wash over the models will give contrast and immediately make your base colours look better. My preferred method is to apply washes and shades by hand so that I am not reliant upon a single tone to do all the work.
The main wash here is a generous application of Agrax Earthshade (was Devlan Mud) across all cloth, and weapons and equipment. The skin received the Ogryn Flesh, Gryphonne Sepia was applied to all metal painted with Desert Yellow, finally any metals received a coat of Nuln Oil.
Finally, the base received a drybrush of Karak Stone all over, except any previously applied patches of Agrellan Earth which received a wash of Gryphonne Sepia. (NOTE: I am thinking to go back and apply a wash of Agrax Earthshade as I am not entirely happy with the lack of contrast.) The base is finished off with a rim colour of Abaddon Black.
Again at this stage the models look good on the tabletop, although personnaly I would prefer to advance the basing as below.

Highlights were then applied. Skin took a layer of Dwarf Flesh, then a second layer of Elf Flesh with a dab of Dwarf Flesh in it (ratio approximately 3:1). Everything else had one highlight applied, but because I previously used a wash and the highlight was slightly watered down it can give the impression of a lot more work!
The trick here was to add Karak Stone to every base colour to create the highlight colours (this was a 1:1 ratio) and of course to leave the shade and some of the base layers showing. Using Karak Stone as my mix-in for all colours (1) ties all the colours together, and (2) keeps the colours drab. If I was painting more vibrant models I may use a Bleached Bone as my mix-in colour; I avoid using White Scar as a mix-in as I do not like the artificial wash-out of the base colour that happens using white.
The rocks on the base received a drybrush of Karak Stone + White Scar – one of the few times I’ll use white as a mix-in colour!
At this point the models are looking super-good for gaming, but again I would add the final base stage, below. The base of the model can lift any paint job!

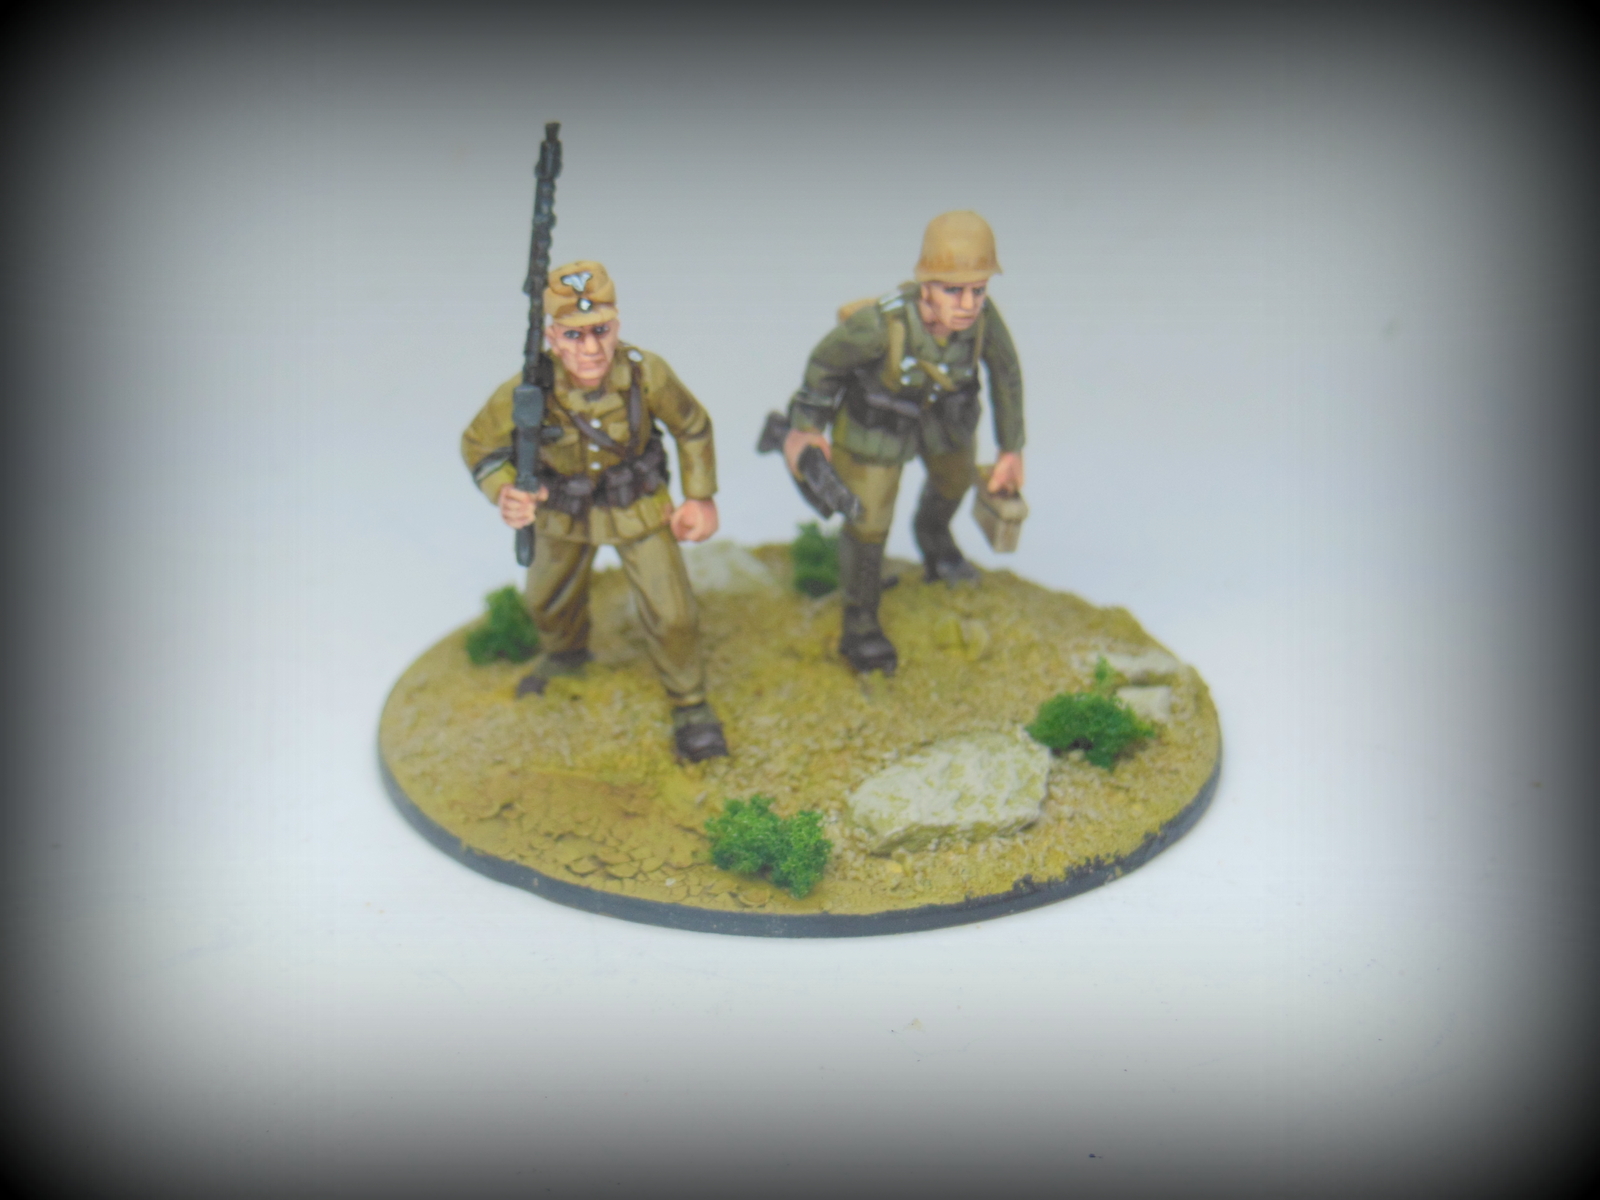
Details are something that makes a model stand out. For me this falls into two categories: faces and iconography.
We’re predisposed to looking at faces, so practice painting eyes! This predisposition is also why I applied two highlight layers to the face rather than one.
Finally I added iconography, such as epaulettes, buttons, and such-like. Looking at these photos I can see that I missed the red dot in the middle of the cap badge and the collar bars. I’ll get these done and re-edit this post later…
Some bush foliage was added to the base to complete the desert scrub look I was aiming for. The green gives something else to an otherwise bleached out base and I feel this lifts the models which are pretty brown themselves!

I hope you found something of use in this. Why not leave a note in the comments.
